AR01V3 Multi-Protocol Home Automation Gateway

Polska wersja README · Project website
RF/IR learning and Flipper import, ESP-RC01, native IR climate, Hob²Hood/Faber and optional Steinel NightmatIQ Plus in one AR01V3 firmware.
RF/IR remote -> Flipper Zero -> .sub/.ir file -> AR01V3 gateway (+ optional ESP-RC01 remotes) -> Home Assistant
Electrolux/AEG Hob²Hood hob -> IR -> AR01V3 -> IR -> Faber hood (+ optional Home Assistant)
Steinel NightmatIQ Plus <-> Bluetooth Mesh <-> AR01V3 gateway -> Home Assistant
Community ESPHome firmware that turns the ESP32-based Athom AR01V3 into a multi-protocol home automation gateway. Its shared firmware combines persistent RF/IR learning and replay, Flipper-compatible import, ESP-NOW support for ESP-RC01 remotes, native IR climate control, an optional local Hob²Hood-to-Faber bridge, optional Steinel NightmatIQ Plus Bluetooth Mesh integration, and Home Assistant connectivity. Features can be enabled independently without maintaining separate firmware editions.
The gateway provides 16 persistent RF slots and 10 persistent IR slots, remote signal provisioning over the network, standard Home Assistant button entities, parameterized and GUI-friendly transmission actions, and support for up to 10 ESP-RC01 remotes across up to 10 AR01V3 receivers. Each ESP-RC01 button can either be routed to Home Assistant or assigned directly to a stored IR/RF slot, allowing autonomous operation when Home Assistant is unavailable. Stored commands can also be assigned to virtual devices, scripts, scenes, and automations without hard-coded appliance mappings.
Version 1.2.4 adds an optional local Electrolux/AEG Hob²Hood-to-Faber bridge. AR01V3 can translate the hob’s infrared fan and light commands directly, without Home Assistant in the control path and without consuming stored IR slots. A separate Faber device in Home Assistant remains optional.
Author and maintainer: Bartosz Supcziński — bartek@env.pl
Why this project exists
The AR01V3 is inexpensive, mains powered, network connected, and well suited to remaining in the room where RF or IR commands must be transmitted. This project makes its stored signals reusable Home Assistant resources instead of controls tied only to a device page. Every slot has its own entity button, while parameterized actions allow both stored and directly supplied signals to be used from the Home Assistant GUI.
Once a compatible signal file or definition is available, an installed gateway can be provisioned and tested over the network. There is no need to connect it by USB, rebuild the firmware, stand next to the AR01V3, or bring the original remote to its location. This is particularly useful for gateways mounted in remote, difficult-to-reach, or multiple locations.
ESP-RC01 support adds a second role: inexpensive physical remotes can trigger Home Assistant actions through ESP-NOW or directly transmit a stored IR/RF command from the receiving AR01V3. The local assignment is stored in the gateway and does not require an active Home Assistant connection. For buttons routed to Home Assistant, several AR01V3 receivers can hear the same remote for wider coverage, while the supplied package removes duplicate receptions and emits one pilot-specific event.
Signals can enter the system in three ways: local learning, import of a supported file, or a direct Home Assistant action that does not use a slot.
Adding signals and optional Flipper support
Flipper Zero is not required. The AR01V3 can learn supported IR signals and decodable RC-Switch RF signals directly. Flipper-compatible import is an optional fallback when the AR01V3 cannot learn a signal reliably or when a compatible .sub or .ir file is already available. A file can be imported without owning the device that originally captured it.
The AR01V3 uses inexpensive fixed-frequency 433.92 MHz OOK/ASK hardware. It is a useful automation gateway, but it is not a full RF analyser and cannot be expected to decode every proprietary protocol reliably. A Flipper Zero or another suitable analyser can provide a verified reference capture for signals outside reliable local learning.
Not every RF capture is universal. Files may contain a transmitter identifier, channel, address, or pairing information, so a capture from another installation is not guaranteed to work unchanged with every motor or receiver. Even when direct reuse is not possible, a verified capture can provide reference data for improving native protocol support.
Flipper compatibility is limited to the formats listed below and to the AR01V3’s 433.92 MHz OOK/ASK RF hardware and supported IR transmit path.
Flipper format compatibility
| Flipper format | Import | Replay |
|---|---|---|
| Princeton 433.92 MHz OOK/ASK | Yes | Yes |
| Static Dooya 40-bit 433.92 MHz OOK/ASK | Yes | Yes |
| SubGhz RAW OOK 433.92 MHz | Yes | Yes |
| IR NEC | Yes | Yes |
| IR RAW | Yes | Yes |
| Rolling code | No | No |
| FSK, other RF frequencies, or unsupported presets | No | No |
Screenshots
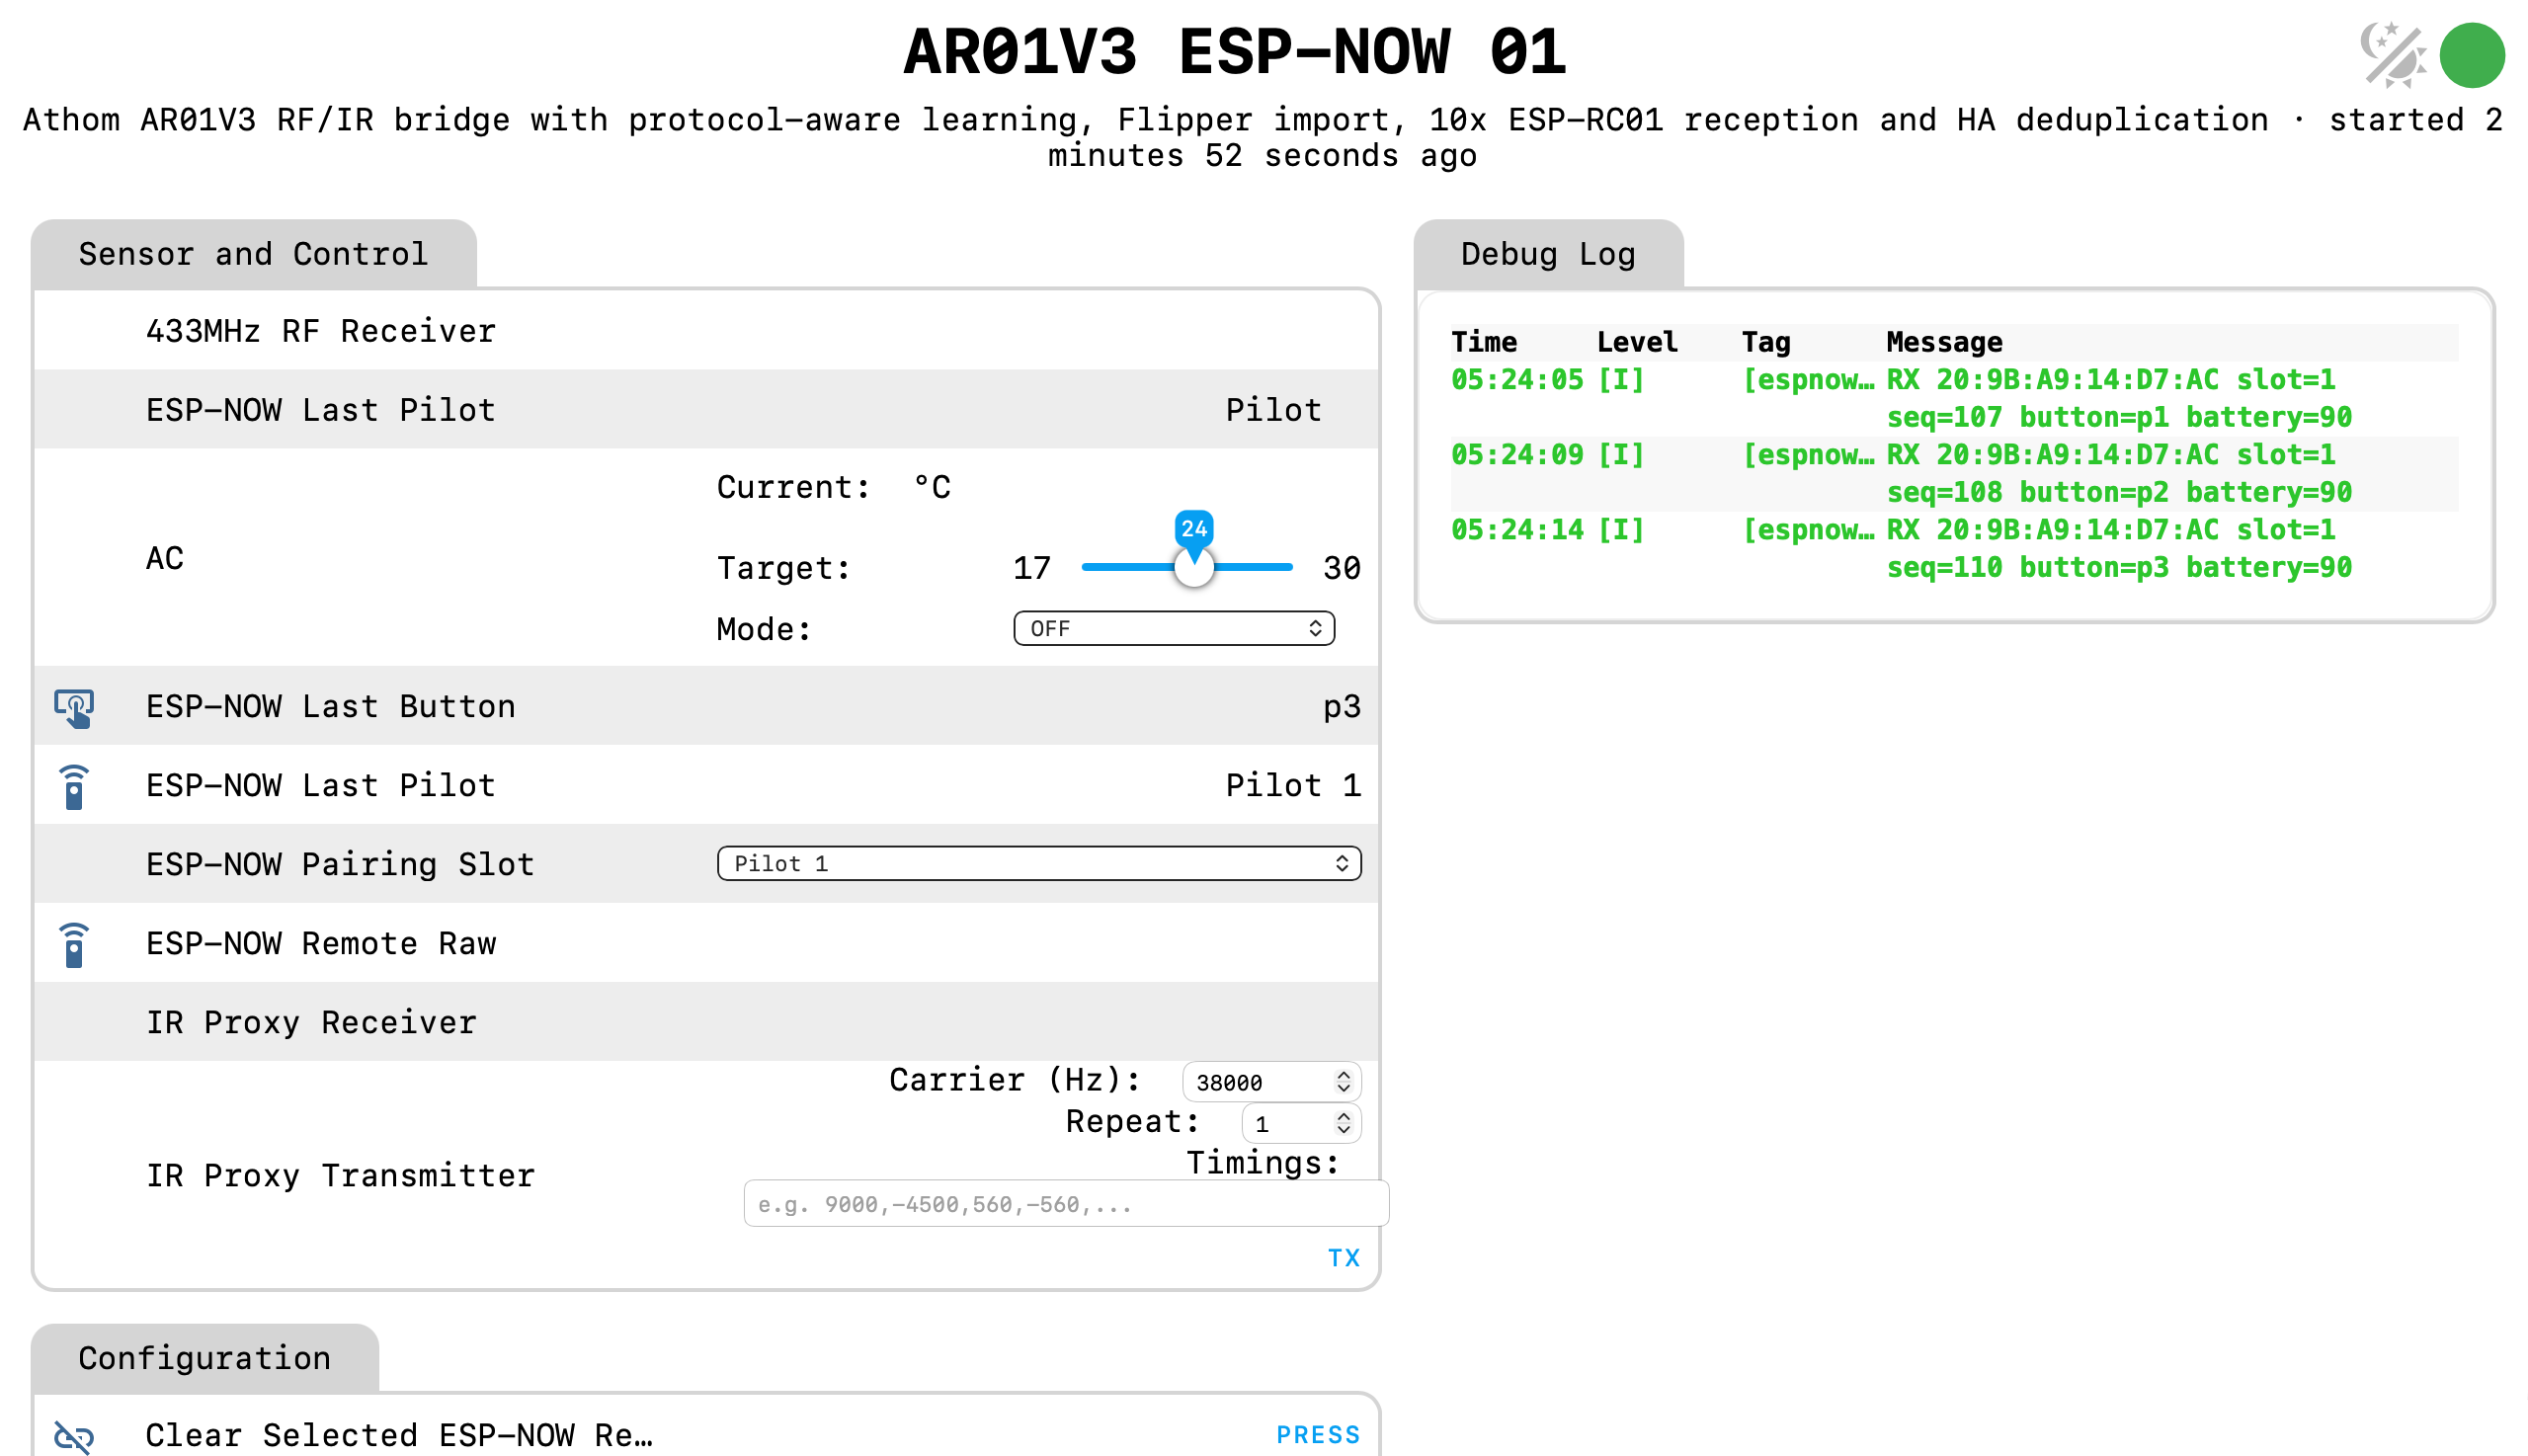
AR01V3 main page
The ESPHome Web Server v3 interface combines signal control, ESP-RC01 pairing and autonomous button assignments, diagnostics, and the existing AR01V3 functions.
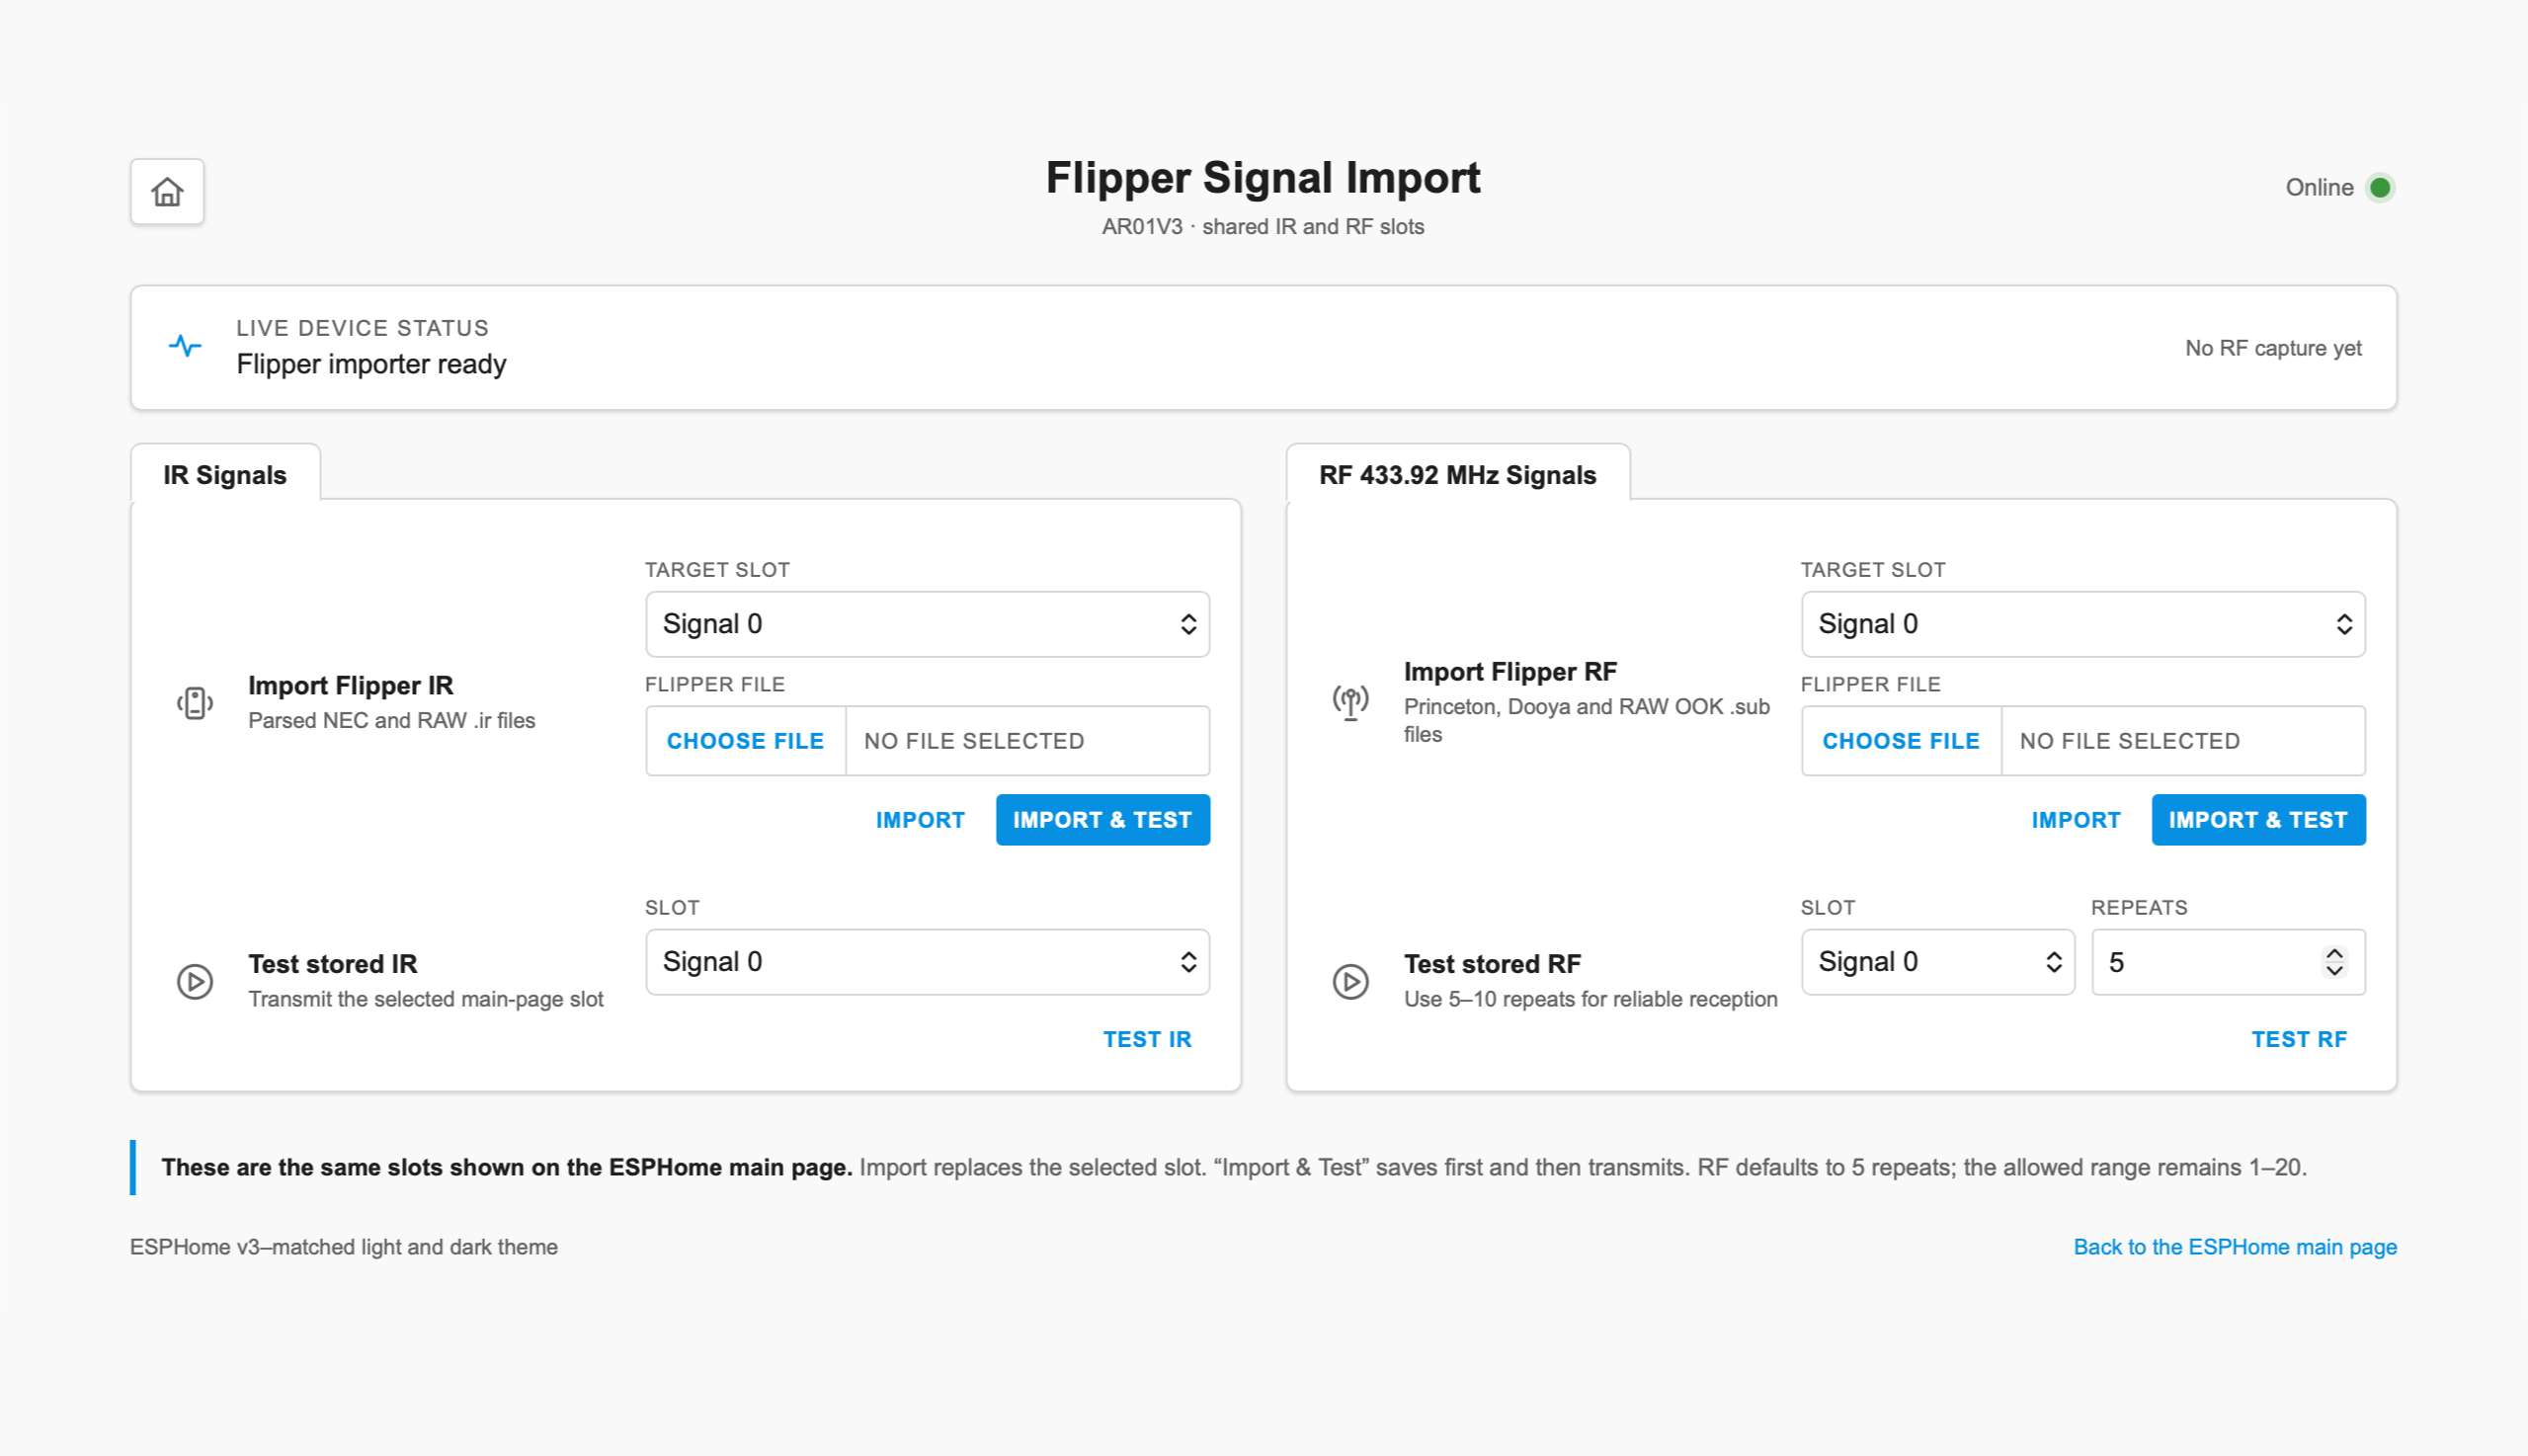
Integrated Flipper importer
The /flipper page imports and tests supported .sub and .ir files directly against the same persistent slots used by the main page and Home Assistant.
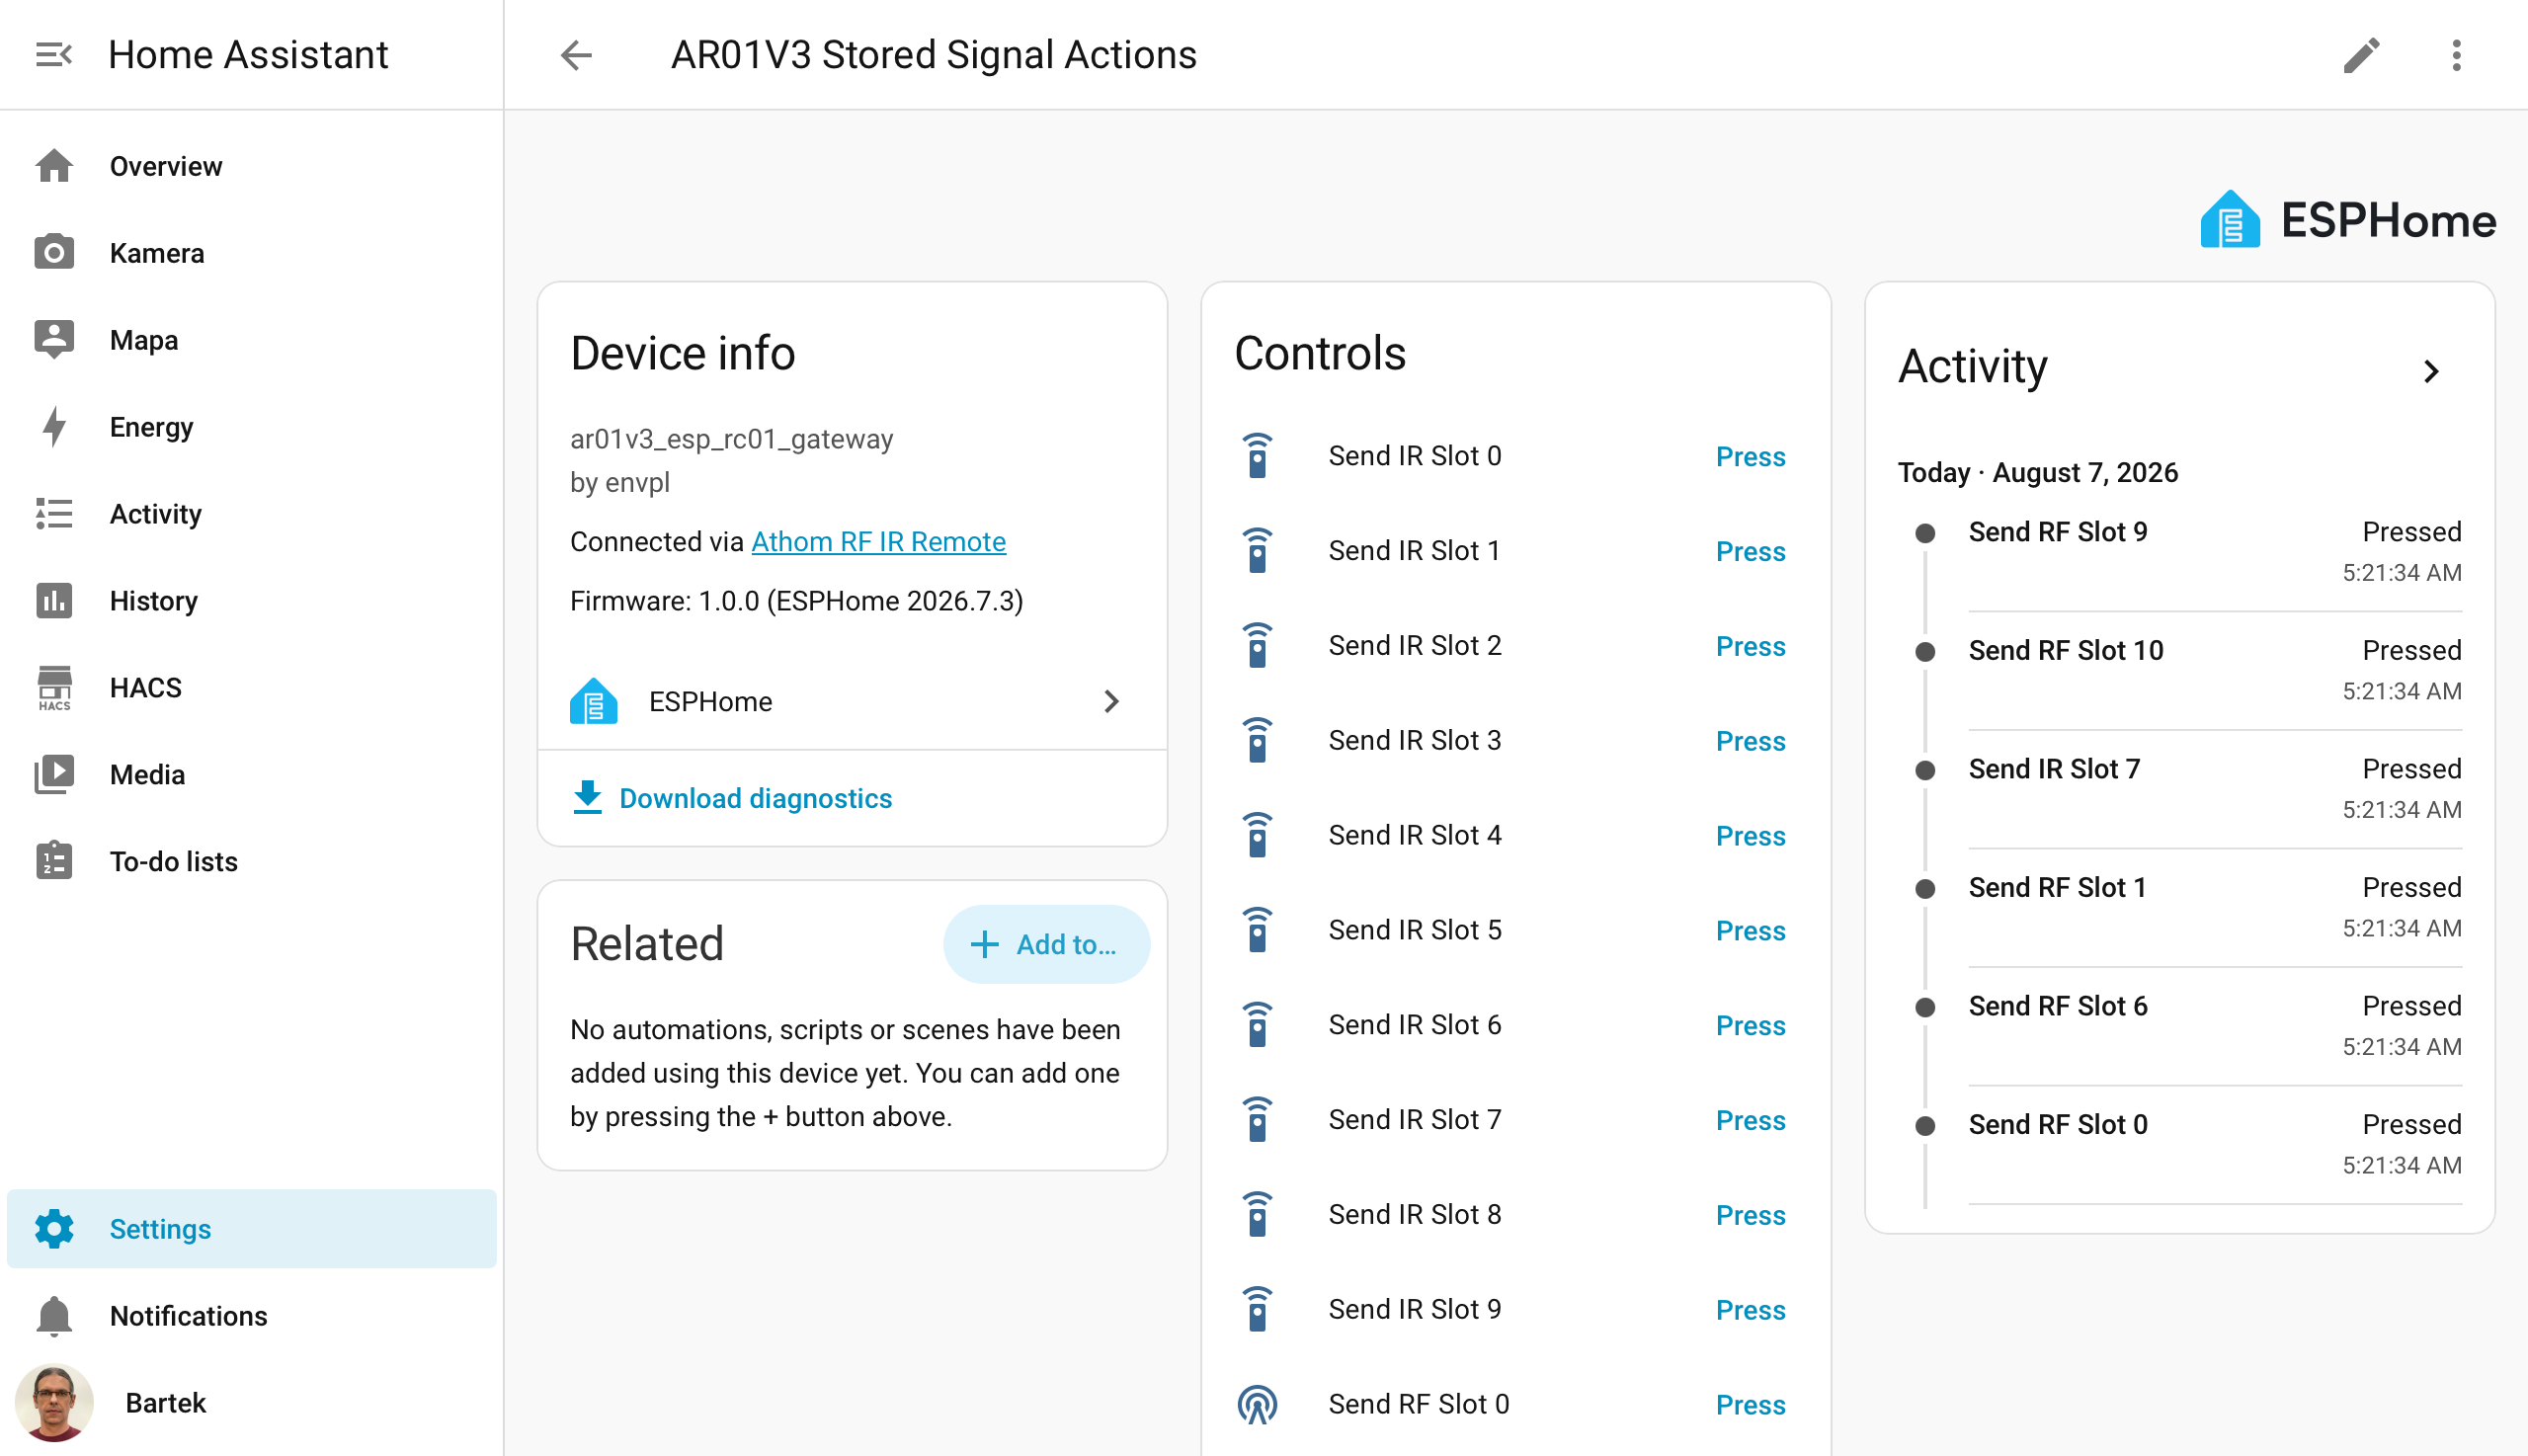
Home Assistant stored-signal actions
Every stored IR and RF slot is exposed as a normal Home Assistant button under the AR01V3 Stored Signal Actions device.
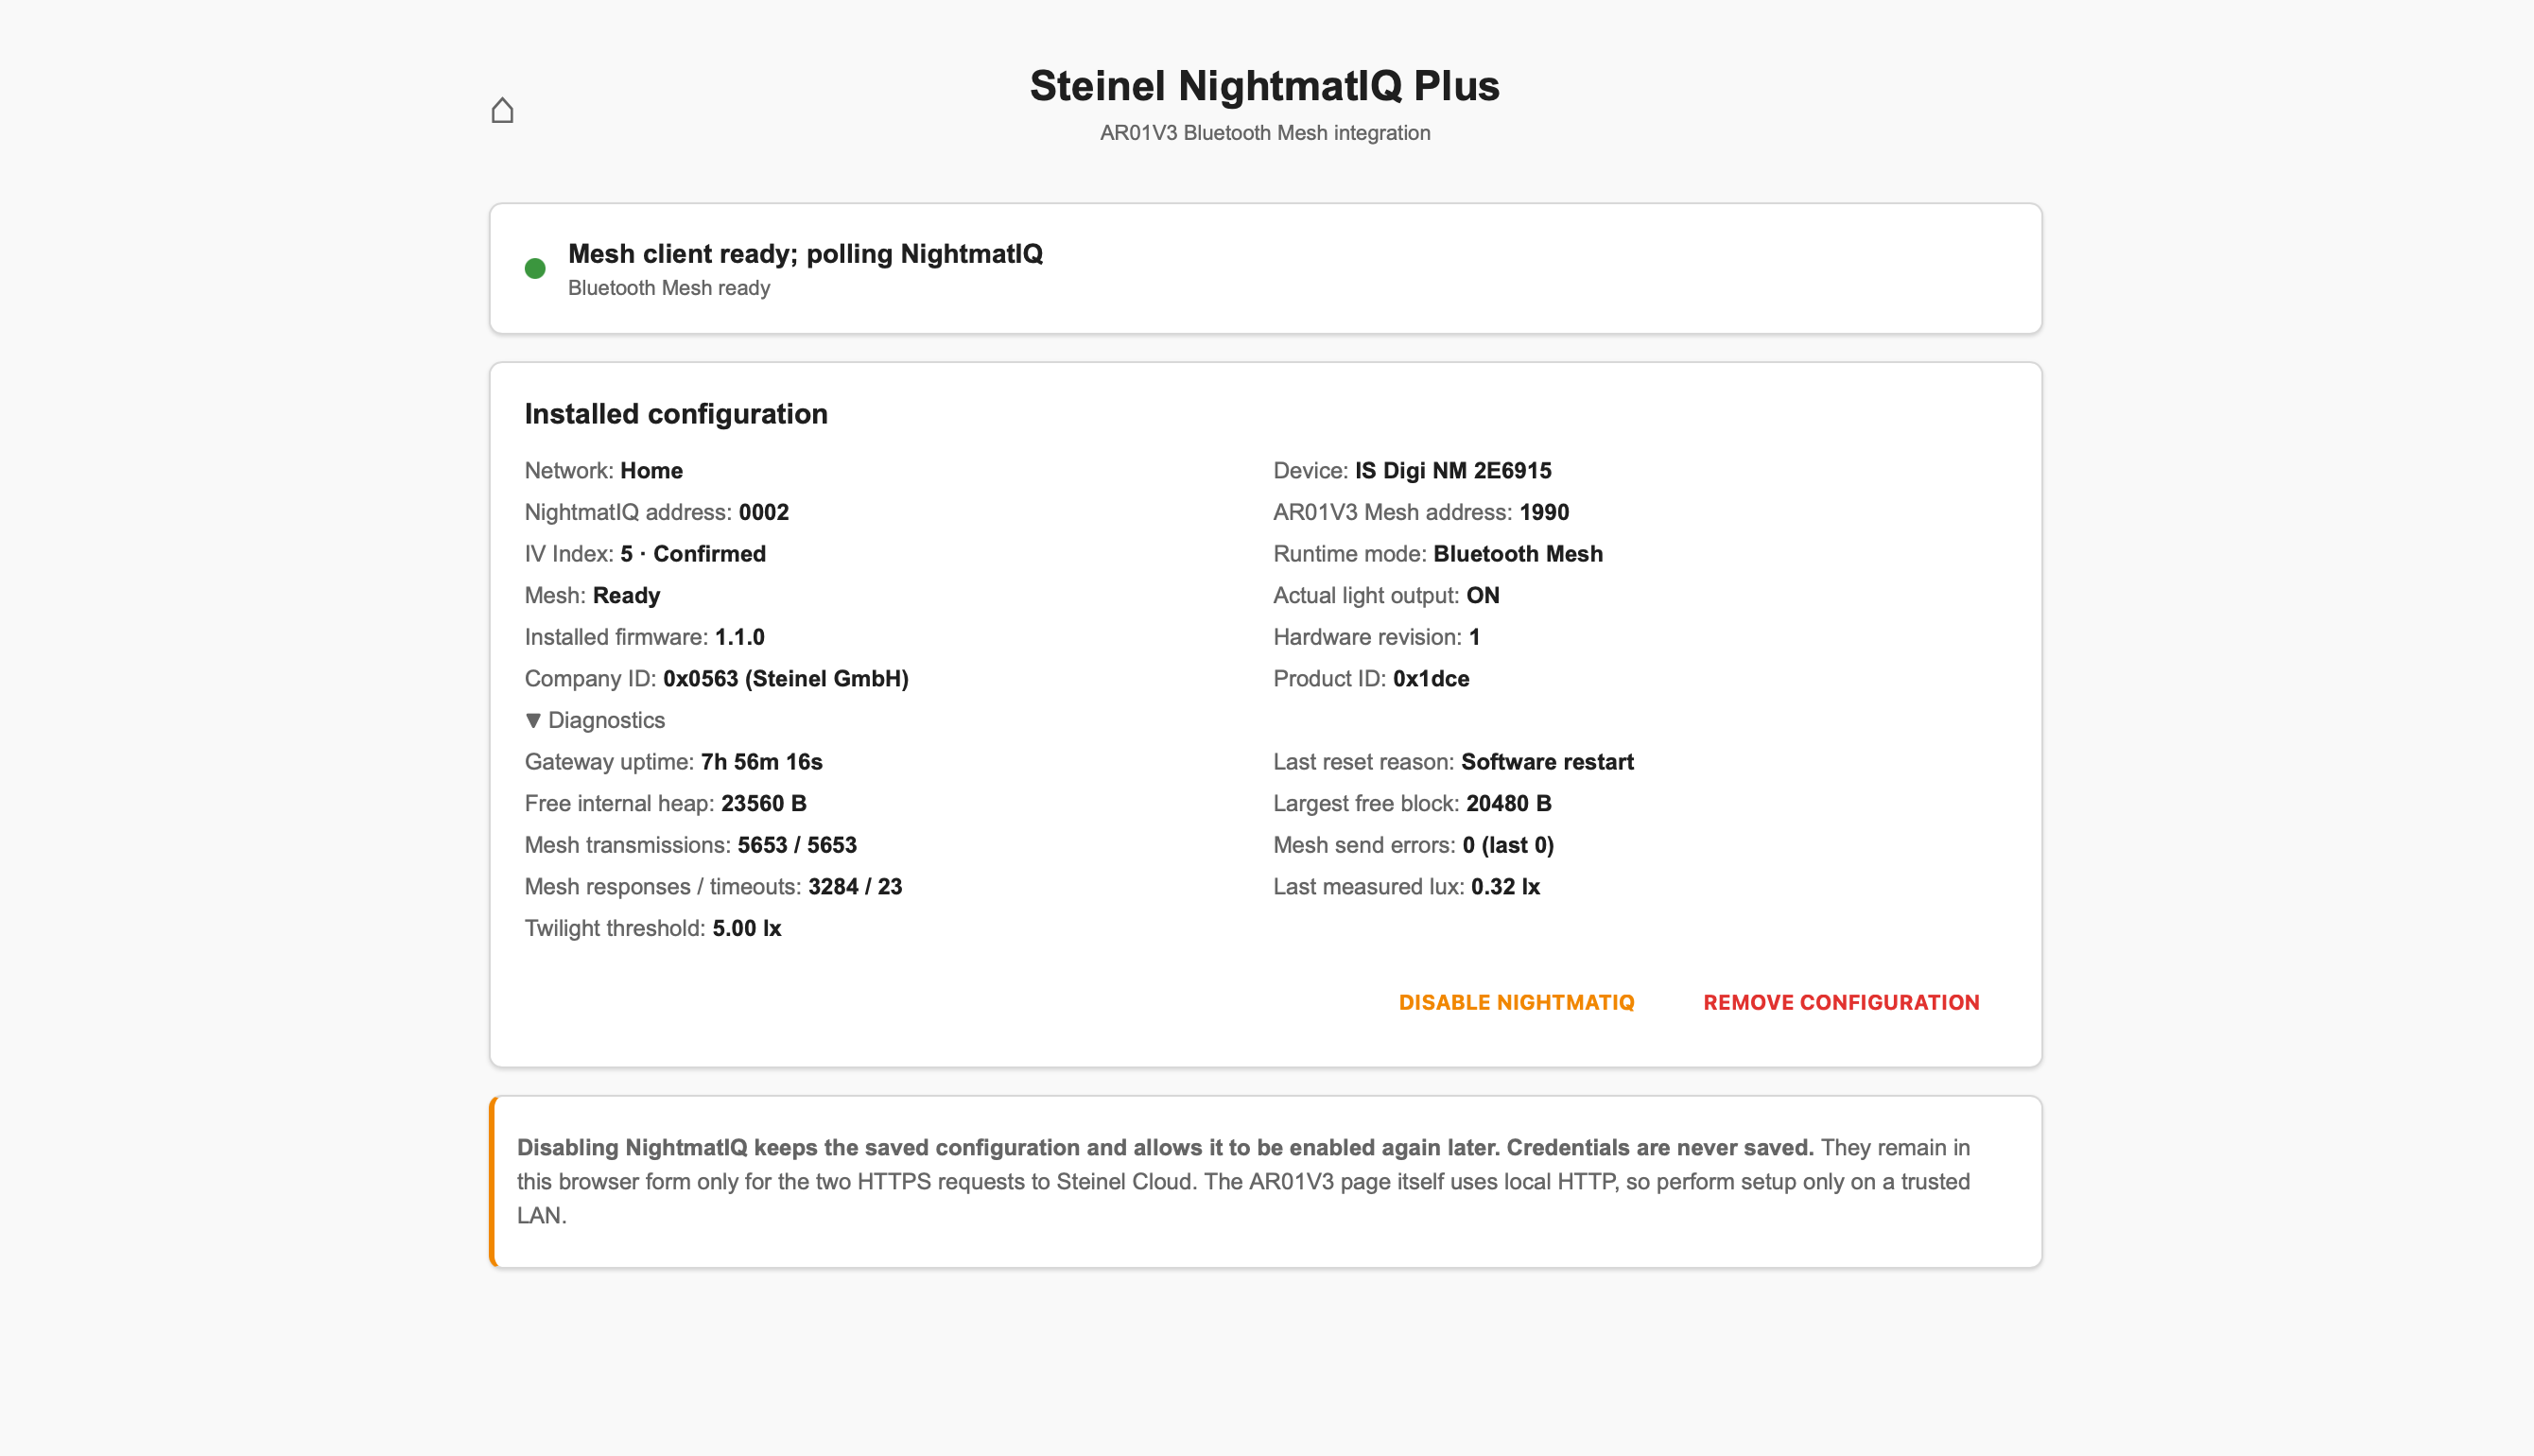
Steinel NightmatIQ Plus
The authenticated /steinel page imports a selected Steinel network, controls the optional Bluetooth Mesh mode, and shows the confirmed device state and diagnostics.
What this project provides
RF and IR signal storage
- 16 persistent RF slots, numbered
0through15. - 10 persistent IR slots, numbered
0through9. - One shared storage model: learning, Flipper import, the local web interface, and Home Assistant all use the same NVS records.
- A hexadecimal preview for every occupied slot and
Nonefor an empty slot. - Individual Home Assistant buttons for all 26 slots under the
AR01V3 Stored Signal Actionssub-device. - RF repeat control from 1 to 20, with a default of 5, plus an optional repeat gap of 0 to 100 ms.
Reliable RF behavior
- 433.92 MHz OOK/ASK reception on GPIO19 and transmission on GPIO18.
- RC-Switch learning accepts a signal only after three matching decoded frames.
- RC-Switch protocol 6 is stored with its true protocol and code, then replayed using the verified compatible waveform. The known 24-bit protocol-6 case is transmitted as Princeton with
TE=403 µsandGuard_time=30. - Imported Princeton, static 40-bit Dooya, and SubGhz RAW files can be stored and replayed.
- Local RF RAW “tape recorder” learning is deliberately disabled. The inexpensive AR01V3 OOK receiver has no RSSI/squelch information and can deliver ambient noise as valid-looking timings. A decoded RC-Switch result is required for local RF learning; use Flipper import for supported RAW or static Dooya signals.
IR behavior
- IR reception on GPIO33 and transmission on GPIO25.
- NEC-first learning with RAW fallback.
- Parsed NEC, parsed NECext, and raw Flipper
.irfiles can be imported. - Learned, imported, stored, and directly supplied Home Assistant signals use the same transmitter path.
Optional native IR climate control
- The configurator presents all supported native IR climate protocols as numbered choices in a compact three-column menu; no platform identifier has to be entered manually.
- The available choices are Disabled, Ballu, Coolix, Daikin, Daikin ARC, Daikin BRC, Delonghi, Emmeti, two Fujitsu General variants, Hitachi AC344, Hitachi AC424, LG, Midea, Mitsubishi, Noblex, TCL112, Toshiba, Whirlpool, Whynter and ZH/LT-01.
- The climate entity is assigned to its own Home Assistant sub-device named after the selected brand, for example Fujitsu or Coolix, and uses the standard
mdi:air-conditionericon. - On the device web interface, climate control and the optional stateless SET button appear together in a separate section named after the selected brand; they are not mixed into Sensor and Control.
- Coolix remains the default for compatibility with existing installations.
- Home Assistant sends a requested climate state to AR01V3; the selected ESPHome protocol generates and transmits the IR frame without using a persistent IR slot.
- When the configured protocol recognizes a compatible original remote, the AR01V3 IR receiver can update the assumed climate state in Home Assistant.
- Infrared control is one-way: a missed original-remote transmission or an IR command sent outside the AR01V3 receiver’s range can leave the Home Assistant state out of sync with the appliance.
- Fujitsu General exposes the complete swing-mode set implemented by ESPHome. Fujitsu General - vertical vane only exposes only Off and Vertical and adds a separate stateless SET button that advances the vertical vane by one physical step. The SET command has no position state to report.
- Fuji Electric and Fujitsu General units using the standard Fujitsu frame format can use either Fujitsu profile; compatibility must still be verified on the target appliance.
Optional Electrolux/AEG Hob²Hood to Faber bridge
- Recognizes Hob²Hood fan speeds 1–4, fan off, light on and light off through the normal AR01V3 IR receiver.
- Transmits the corresponding captured Faber remote commands locally, without requiring Home Assistant and without consuming persistent IR slots.
- Forwards recognized fan repeats instead of deduplicating them, retaining the redundancy used by the hob.
- Converts deterministic light on/off requests into the verified, timing-safe sequence required by the toggle-only Faber light command.
- Provides three independent NVS-persistent controls on the main page: local translation, optional Home Assistant exposure and explicit use of the HA daylight policy. All three default to off.
- When enabled for Home Assistant, creates a separate Faber device with a four-speed fan, light, status and bridge diagnostics.
- The included optional Home Assistant frontend helper turns the Faber section of an automatically generated area into one Hood tile. It opens a native-style combined control with fan power, speeds 1–4 and light; it does not create a dashboard or panel.
- An optional Home Assistant package and GUI blueprint publish one global daylight policy to every compatible AR01V3. Select an illuminance sensor with one threshold (200 lx by default; the automatic blocking threshold is about 267 lx) or select
sun.sun; no gateway selection or installation-specific YAML is required. - The daylight policy is used only after Light by HA is enabled on that gateway and gates only automatic Hob²Hood light-on. If cooking starts while it is bright, the request remains pending and the lamp turns on automatically if the policy changes to allow before the hob sends light-off. Manual Faber/Home Assistant light control, light-off and every fan command remain independent, while a missing or stale Home Assistant policy fails open after five minutes.
- A later automatic Hob²Hood light-off is ignored when AR01V3 already estimates the lamp as off, preventing a toggle-only Faber hood from flashing after daylight policy blocked light-on.
- Fan and light state is estimated from recognized and transmitted commands because the hood has no return channel; physical hood buttons or missed IR frames can leave the estimate out of sync.
- The fixed Faber waveforms are confirmed for the tested installation. Compatibility with another Faber model or remote revision must be verified.
See the Hob²Hood/Faber guide for the exact mapping, light timing, Home Assistant presentation and switch behavior.
Flipper-compatible import page
- Authenticated page at
http://DEVICE_ADDRESS/flipper. - Styling integrated with the ESPHome Web Server v3 page.
- RF support: Princeton, static 40-bit Dooya, and SubGhz RAW OOK at 433.92 MHz.
- IR support: parsed NEC, parsed NECext, and raw timing files.
- Live slot state, validation results, import, test transmission, capture status, and slot clearing on the page itself.
- Neutral regression examples in examples.
Remote signal provisioning
- Upload a supported
.subor.irfile to a selected persistent slot through the authenticated/flipperpage. - Review validation and live slot status, test the stored signal, replace it, or clear it without physical access to the AR01V3.
- Use Home Assistant to transmit any stored slot or send supported slot-free IR/RF data directly over the ESPHome API.
- Manage separately addressed AR01V3 gateways from the same trusted network or through a secure VPN.
- Capturing a previously unknown signal may still require access to the original remote and suitable capture equipment, but provisioning the installed gateway does not.
The embedded web interface uses HTTP Digest authentication but does not provide HTTPS transport encryption. Do not expose it directly to the public Internet; use it on a trusted local network or through a VPN.
ESP-RC01 and multiple receivers
- Ten logical ESP-RC01 pairing slots on every AR01V3 receiver.
- Persistent remote MAC pairing, 60-second pairing window, clearing, battery value, button name/code, packet sequence, and receiver identity.
- Persistent assignments for the buttons reported by every paired remote.
- Per-button choices:
Home Assistant,Ignore, any IR slot0..9, or any RF slot0..15. - Ten separate
ESP-NOW Pilot N Buttonevent entities let Home Assistant distinguish identical buttons on different pilots in GUI automations. - A local IR/RF assignment is executed by the AR01V3 itself and continues to work without an active Home Assistant connection.
Home Assistantis the default for every assignment and forwards the button to the pilot-specific HA event path.- Up to ten AR01V3 receivers may cover the same area. They do not retransmit packets; each receiver reports what it heard.
- The supplied Home Assistant package accepts the first copy, discards duplicates received by other AR01V3 units, and emits only the matching
esp_rc01_pilot_N_buttonevent.
Home Assistant control
- 26 entity buttons for stored slots:
Send IR Slot 0..9andSend RF Slot 0..15. - Parameterized slot actions with validation and status responses.
- Direct, slot-free actions for NEC, IR RAW, Princeton, static Dooya, and RF RAW signals.
- GUI-friendly fire-and-forget action variants whose fields appear in the Home Assistant action editor.
- An optional separate Faber device with four-speed fan, light and diagnostic entities when explicitly enabled on the AR01V3 page.
- Apart from the explicitly optional Hob²Hood/Faber bridge, stored slots have no appliance mapping hard-coded. You assign them to virtual devices, scripts, scenes, and automations in Home Assistant.
Existing AR01V3 functionality retained
- ESPHome native API and OTA.
- Authenticated Web Server v3 home page.
- Browser-based firmware OTA upload.
- Bluetooth Proxy with two connection slots.
- Wi-Fi diagnostics, uptime, restart, safe mode, factory reset, fallback access point, and status LED.
- Optional native infrared climate control selected independently for each receiver.
Optional Steinel NightmatIQ Plus integration
The normal firmware includes an authenticated /steinel page that can import a
selected Steinel Cloud network backup without storing the account password. It
then exposes a separate NightmatIQ device in Home Assistant with illuminance,
twilight threshold, operating mode, resilient actual-output state, installed
firmware, hardware revision, Company ID, Product ID, and diagnostic Mesh signal
strength. AR01V3 selects and persists a source address from the unused portion
of the imported provisioner range. If a fresh Mesh sequence is rejected by a
peer’s Replay Protection List after removal, reimport, or gateway replacement,
the firmware can conservatively advance to another saved address and locks the
first address that receives an authenticated response. AR01V3 runs Bluetooth
Proxy by default; enabling NightmatIQ switches the next boot to Bluetooth Mesh.
Disabling it from the web page preserves the Mesh data and restores Bluetooth
Proxy after reboot. RF, IR and ESP-NOW remain available in both modes. See
the NightmatIQ guide.
Hardware and pin assignment
This project targets Athom AR01V3 with ESP32 and 8 MB flash.
| Function | GPIO | Notes |
|---|---|---|
| RF receiver | 19 | inverted input, 433.92 MHz |
| RF transmitter | 18 | OOK/ASK output |
| IR receiver | 33 | inverted input |
| IR transmitter | 25 | carrier output |
| Local button | 0 | inverted input |
| Status LED | 27 | status output |
Do not flash this configuration to a different hardware revision without verifying its schematic and pinout.
Repository layout
| Path | Purpose |
|---|---|
esphome/ar01v3-01.yaml … ar01v3-10.yaml |
Ten unique receiver entry points |
esphome/ar01v3-multi-protocol-base.yaml |
Shared multi-protocol firmware configuration |
esphome/components/ |
Persistent storage, Flipper importer, climate, Hob²Hood/Faber and NightmatIQ components |
home-assistant/ |
ESP-RC01 and Faber packages, GUI automation blueprints, optional Faber area helper, and examples |
examples/ |
Neutral Princeton, Dooya, and NEC fixtures |
scripts/ |
Installation, configuration, validation, build, upload, and log helpers |
tests/ |
Host-side regression and component build tests |
Requirements
- Athom AR01V3 hardware.
- A data-capable USB-C cable for the first installation or recovery.
- A 2.4 GHz Wi-Fi network.
- Debian or Ubuntu for the supplied installation scripts. Other systems can use a normal ESPHome installation.
- Python 3.12, 3.13, or 3.14.
- ESPHome 2026.7.3. The installation helper pins this version because the configuration uses current API action and Web Server features.
- Home Assistant with the ESPHome integration for Home Assistant control. It is not required for an already configured autonomous ESP-RC01-to-slot assignment.
For ESP-NOW reliability, configure all access points serving these receivers to use the same fixed 2.4 GHz channel. An ESP32 follows its Wi-Fi channel, so automatic channel changes can prevent receivers on different access points from hearing the same ESP-NOW transmission.
1. Download and prepare the project
Clone or download the repository, then enter its root directory:
git clone https://github.com/supczinskib/athom-ar01v3-multi-protocol-gateway.git
cd athom-ar01v3-multi-protocol-gateway
On Debian or Ubuntu, install the pinned ESPHome environment:
sudo bash scripts/01_install_esphome.sh
This creates /opt/esphome-10x10. If ESPHome is already installed elsewhere, set the ESPHOME environment variable to its executable before using the helper scripts.
2. Configure the installation
Run:
bash scripts/02_configure.sh 03
The argument selects the physical AR01V3 configuration used by the subsequent
compile, upload, and log commands. The configurator shows the current values
and accepts Enter without changing them. Passwords are displayed only as
********; pressing Enter preserves the real value already stored in the
file. It configures:
- the 2.4 GHz Wi-Fi SSID and password;
- the local web-interface username;
- a web password of 12-63 characters;
- optionally, a separate fallback-AP password;
- the native IR climate profile for the selected receiver.
The script creates or updates esphome/secrets.yaml, preserves unknown existing
keys, and stores it with mode 0600. The selected receiver and climate choices
are stored separately in esphome/climate.local.json. Both local files are
ignored by Git. Existing credentials are never replaced with the displayed
asterisks.
For a manual setup, copy esphome/secrets.example.yaml to
esphome/secrets.yaml and replace every placeholder, then still run
scripts/02_configure.sh DEVICE_NUMBER to select the receiver and review its
climate profile. Receiver configurations without a saved climate choice retain
the published Coolix default.
3. Customize the selected receiver configuration
Use one entry-point file per physical AR01V3:
- first unit:
esphome/ar01v3-01.yaml; - second unit:
esphome/ar01v3-02.yaml; - continue through
ar01v3-10.yaml.
Each file has a unique ESPHome node name and receiver_id. The receiver chosen
by scripts/02_configure.sh is remembered locally; later commands display that
choice but do not ask for it again. Do not flash the same receiver number to two
active devices. You may change friendly_name, room, and timezone; keep
name and receiver_id unique. The publication defaults use UTC and no area.
4. Validate before flashing
Run the complete source, parser, C++, YAML, and ten-configuration validation:
bash scripts/03_validate_all.sh
For the faster host-side regression test only:
bash scripts/00_self_test.sh
When preparing a clean archive or GitHub release, run the stricter publication check from a tree that does not contain esphome/secrets.yaml:
bash scripts/00_self_test.sh --publication
Normal deployment validation intentionally permits the local, Git-ignored secrets.yaml; publication mode rejects it.
Validation does not prove RF range or compatibility with a particular appliance. Hardware behavior must still be tested on the intended equipment.
5. Compile firmware
Compile the receiver selected during configuration:
bash scripts/04_compile_one.sh
The script prints the generated firmware.factory.bin, firmware.bin, and/or firmware.ota.bin paths. Compile all ten configurations only when you actually need all ten images:
bash scripts/06_compile_all.sh
6. First installation or recovery through USB
Connect the AR01V3 with a data-capable USB-C cable. List detected ports:
bash scripts/08_list_serial_ports.sh
Then flash the selected receiver using the exact /dev/serial/by-id/... path shown by the previous command:
sudo bash scripts/09_upload_usb.sh /dev/serial/by-id/REPLACE_WITH_YOUR_PORT
The ESPHome command performs compilation when necessary and uploads the correct serial image. Do not disconnect power while flash is being written. If no port appears, check the cable, USB permissions, and whether another process is using the port.
7. Updating over Wi-Fi from the command line
After the first successful USB installation, use native password-protected ESPHome OTA:
bash scripts/05_upload_ota.sh
The script uses the selected receiver’s .local name. An IP address or another
hostname may be supplied as its only optional argument. Before uploading it
prints the selected receiver, climate profile, configuration file, and target;
it does not ask for the receiver again.
8. Updating from the device web page
- Compile the matching receiver configuration with
scripts/04_compile_one.sh. - Open
http://DEVICE_ADDRESS/. - Sign in with the web credentials configured by
scripts/02_configure.sh. - Find OTA Update.
- Select the matching
firmware.binorfirmware.ota.binshown by the compile script. - Start the update and wait for the device to reboot.
Never upload firmware.factory.bin through OTA; that image is for an initial serial or factory installation. The page can stop responding during the update. Do not remove power. Browser OTA is convenient, but native ESPHome OTA is preferred on a trusted local network.
9. Logs and diagnostics
Read network logs from the selected receiver:
bash scripts/10_logs.sh
An IP address or hostname may be supplied as the only optional argument.
The firmware disables serial logger output (baud_rate: 0) to avoid conflicts with the device design. Use API/network logs.
Device web interface
Open http://DEVICE_ADDRESS/ and authenticate. The main page provides:
- IR and RF slot selection, learning, sending, and clearing;
- live learning status;
- preview rows for every IR and RF slot;
- RF repeat and repeat-gap controls;
- ESP-RC01 pairing, battery, MAC, recent packet diagnostics, and persistent button-to-slot assignments;
- native climate control in a separate brand-named section when it is enabled;
- the installed project firmware version under web diagnostics;
- restart, safe mode, factory reset, and diagnostics;
- a Flipper Import Page — PRESS entry that opens
/flipper.
Clearing a slot deletes its persistent NVS record. Factory reset removes device preferences, pairing data, and stored signal state; treat it as destructive.
Learning and using IR signals
- On the main device page, choose
Signal 0throughSignal 9under IR Signal Slot. - Press IR Learn.
- Point the original remote toward the AR01V3 and press the required button once.
- Wait for IR Learning Status to report a saved NEC or RAW signal.
- Press IR Send to test the selected slot.
- The matching
IR Slot Npreview andSend IR Slot NHome Assistant button update automatically.
NEC decoding is preferred because it produces a compact, repeatable record. Unsupported protocols fall back to a normalized RAW capture when the receiver obtains a valid frame.
Learning and using RF signals
- Choose
Signal 0throughSignal 15under RF Signal Slot. - Leave RF Repeat Count at 5 for the first test. Adjust it only if the target requires a different number.
- Press RF Learn.
- Hold the original RF button until the status reports three matching frames and a saved signal.
- Press RF Send to test the selected slot.
Local learning supports decodable RC-Switch signals. Different numbers of raw timings between attempts do not by themselves indicate a usable signal. If the status reports no decoded frame, capture the signal with a suitable tool and import a supported Flipper file instead. This is a protocol limitation, not proof that RF transmission is defective.
Importing Flipper files
- Open
http://DEVICE_ADDRESS/flipperor press Flipper Import Page on the main page. - In the IR or RF panel, select the destination slot.
- Choose a supported
.iror.subfile. - Import it. Review the live status shown on the same page.
- Use the test button before assigning the slot in Home Assistant.
- Return to the main page and confirm that the slot preview is no longer
None.
Importing into an occupied slot replaces its previous record. Keep original signal files as your backup. Dooya support is for static 40-bit codes only; rolling-code motors are not supported. The project does not add FSK support or other RF frequencies.
Home Assistant integration
Add each AR01V3
- In Home Assistant, open Settings → Devices & services.
- Add the ESPHome integration if the device was not discovered automatically.
- Enter the AR01V3 IP address or
.localhost name. - Complete the connection and assign an area if desired.
The primary device appears as AR01V3 Gateway NN, where NN is the configured receiver number. Home Assistant may show AR01V3 Stored Signal Actions as a second sub-device. This is intentional: the second device contains the 26 GUI buttons designed for virtual devices, scripts, scenes, and automations.
If those buttons do not appear after a firmware update, reload the ESPHome integration or restart Home Assistant. Confirm that the device reports project version 1.2.4.
Use a stored slot in the GUI
Use an entity action, not an ESPHome “device action”:
- In a script or automation, press Add action.
- Search for Button: Press.
- Select the entity named
Send RF Slot NorSend IR Slot Nunder AR01V3 Stored Signal Actions. - Save and run the script or automation.
The preview entity sensor...rf_slot_0 only displays what is stored. It does not transmit. Always use the corresponding button...send_rf_slot_0 entity to send from the GUI.
Create a virtual screen/cover in the GUI
Assume RF slot 0 contains up and RF slot 1 contains down:
- Open Settings → Devices & services → Helpers → Create helper.
- Create a Toggle named
Screen assumed open. It stores Home Assistant’s assumed position because a one-way RF remote provides no feedback. - Create another helper and choose Template → Cover.
- Name it
Screenand choose theShutterdevice class. -
In State, enter:
openUse the actual entity ID created for your toggle.
- Under Actions when opening, add Button: Press → Send RF Slot 0, then add Input boolean: Turn on → Screen assumed open.
- Under Actions when closing, add Button: Press → Send RF Slot 1, then add Input boolean: Turn off → Screen assumed open.
- If you have a stored stop signal, assign it under Actions when stopping.
- Save the helper and add the new
Screencover entity to a dashboard.
The displayed position is assumed, not measured. If the physical screen is operated outside Home Assistant, correct the toggle manually or add real position feedback.
Create virtual appliance buttons in the GUI
For a projector, receiver, light, or other stateless remote command:
- Open Settings → Automations & scenes → Scripts → Create script.
- Give the script a clear name, such as
Projector ON. - Add Button: Press and select the appropriate
Send IR Slot NorSend RF Slot Nentity. - Save it.
- Add the script entity to a dashboard as a button.
Repeat for OFF, input selection, sound mode, screen movement, and other commands. Scripts are reusable actions and are normally the simplest GUI building blocks for a virtual remote.
Combine signals with a scene
A Home Assistant scene stores desired entity states; it does not run arbitrary transmissions. Use a short script to combine both:
- In Settings → Automations & scenes → Scenes, create the stateful scene, for example dimmed lights.
- In Scripts, create
Movie mode. - Add Scene: Activate and select the scene.
- Add Button: Press actions for the required stored IR/RF slots.
- Add delays between power-on, input selection, and motor commands when the equipment requires them.
- Save the script and add it to a dashboard, automation, or voice assistant.
This keeps the scene responsible for states and the script responsible for the ordered physical commands.
Send a code directly from Home Assistant without a slot
The following GUI-friendly ESPHome actions are available. Their exact prefix depends on the receiver node name, for example esphome.ar01v3_espnow_01_transmit_rf_princeton:
| Action suffix | Required fields |
|---|---|
transmit_ir_nec |
address, command, repeats |
transmit_ir_raw |
signed timings text, carrier_hz, duty_percent, repeats |
transmit_rf_princeton |
code_hex, bit_count, te_us, guard_multiplier, repeats, gap_ms |
transmit_rf_dooya |
40-bit code_hex, repeats |
transmit_rf_raw |
signed timings text, repeats, gap_ms |
Open Developer tools → Actions, search for the full action name, fill in the fields, and test it. After verification, select the same action in a script or automation. Direct actions transmit immediately and do not alter any slot.
Status-returning variants named send_ir_nec, send_ir_raw, send_rf_princeton, send_rf_dooya, and send_rf_raw are also exposed for advanced callers. Stored slots are available as send_ir_slot and send_rf_slot actions, but the 26 button entities are easier in the GUI.
ESP-RC01 pairing and deduplication
Pair one remote
Pair the same physical ESP-RC01 into the same logical slot on every AR01V3 that should hear it:
- On receiver 01, choose ESP-NOW Pairing Slot → Pilot 1.
- Press Pair ESP-NOW Remote. The pairing window remains open for 60 seconds.
- Press a button on the ESP-RC01 and confirm that Paired ESP-NOW Pilot 1 shows its MAC address.
- Repeat on receiver 02, 03, and so on, always using
Pilot 1for that same remote. - Use
Pilot 2for the second physical remote, throughPilot 10for the tenth.
The logical slot is part of Home Assistant’s deduplication key. Do not place one physical remote in different logical slots on different receivers.
Assign a remote button to an autonomous local action
First store and test the required command in an IR or RF slot. Then open the authenticated main page of the AR01V3 that should transmit it:
- Under ESP-RC01 Button Assignment, choose the paired Pilot.
- Choose the physical Button.
- Under Action, select an IR slot, an RF slot,
Home Assistant, orIgnore. - Confirm the resulting mapping in the Assignment row.
- Press the physical button and verify the target device reacts.
The mapping is saved automatically and survives a normal reboot or firmware update. A local slot action is executed entirely by the AR01V3, so it still works when Home Assistant is offline. RF actions use the current RF Repeat Count and RF Repeat Gap settings. Home Assistant forwards the button to the pilot-specific event path, while Ignore performs no transmission and emits no Home Assistant event.
Assignments are stored independently on each receiver. If several AR01V3 units hear the same remote, configure the local action only on the unit that should transmit it; otherwise multiple receivers can execute the same command. Home Assistant deduplication applies only to buttons routed to Home Assistant, not to autonomous local transmissions.
Install the Home Assistant package
Back up the Home Assistant configuration first. On a Home Assistant host where the configuration directory is available as a normal filesystem, run:
sudo bash scripts/07_install_ha_package.sh /var/lib/homeassistant
Replace the path when your configuration directory is elsewhere. The installer backs up configuration.yaml, detects common package include styles, installs exactly one compatible package variant, and stops rather than rewriting an unfamiliar package layout.
For Home Assistant OS, copy one of the following manually with Studio Code Server, File editor, Samba, or SSH:
- use
home-assistant/esp_rc01_10x10_package.yamlwithpackages: !include_dir_named packages; - use
home-assistant/esp_rc01_10x10_package_merge_named.yamlwithpackages: !include_dir_merge_named packages.
Install only one variant, check the Home Assistant configuration, and restart Home Assistant. The package automation may be visible as read-only in the UI because it is defined in a package rather than automations.yaml; that is expected. Create your own user automations in the GUI and trigger them from the required pilot-specific event.
Simplified whole-pilot setup in the GUI
The included ESP-RC01 pilot button actions blueprint configures every button of one logical pilot in a single GUI automation without manually entering event names or YAML event data.
The installer copies both the deduplication package and the blueprint:
sudo bash scripts/07_install_ha_package.sh /var/lib/homeassistant
After installation:
- Restart Home Assistant.
- Open Settings → Automations & scenes → Blueprints.
- Select ESP-RC01 pilot button actions to create an automation from it.
- Name the automation, for example
Pilot 1. - Under ESP-RC01 pilot, select the logical pilot number used during pairing, for example Pilot 1.
- Under Main buttons, add actions for ON, OFF, Night, and brightness control.
- Under Preset buttons P1–P7, add the required preset actions.
- Leave unused action fields empty.
- Save the automation and test the physical pilot.
- Create another automation from the same blueprint for each additional pilot.
On the AR01V3 page, every button handled by the blueprint must use the Home Assistant assignment. A local slot assignment or Ignore emits no Home Assistant event. Do not assign the same button to both the blueprint and a separate Home Assistant automation unless both actions are intended.
Create a remote-button automation in the GUI
For a single AR01V3 receiver, choose the required ESP-NOW Pilot N Button event entity as the trigger and select its event type, such as on, off, or p1. Because every pilot has a separate entity, no pilot-number template or YAML filter is required.
These event entities remain available in Home Assistant but are omitted from the embedded AR01V3 web page because they are event sources, not local controls.
When several AR01V3 receivers hear the same pilot, use the installed deduplication package and an Event trigger. Set its event type to the pilot-specific name, for example esp_rc01_pilot_1_button, and set event data to the required button:
button: "on"
The package emits esp_rc01_pilot_1_button through esp_rc01_pilot_10_button. For example, Pilot 1 and Pilot 2 use different event types even when both physical buttons are named on:
- Open Settings → Automations & scenes → Create automation.
- Add trigger Event.
- Set event type to
esp_rc01_pilot_1_button. -
In event data, select the button, for example:
button: "on" - Add any GUI action: activate a scene, run a script, press a stored-slot button, or control a normal Home Assistant entity.
- Save and test it.
The pilot-specific event also includes sequence, button_code, battery, remote_mac, and receiver. See home-assistant/automation_examples.yaml for optional examples.
Signal record behavior
- IR slots use logical NVS keys
irsig_0throughirsig_9. - RF logical slots are mapped by the storage component to the RF key range beginning after the IR slots. The web importer, learner, sender, previews, and Home Assistant buttons all call the same storage component, preventing split slot state.
- Records store signed 32-bit timings and protocol metadata as required. A preview shows up to the first eight bytes in hexadecimal and appends
...when more data exists. - Existing records survive normal reboot and firmware update. Clearing a slot or factory reset removes them.
Known limitations
- RF is fixed to the AR01V3’s 433.92 MHz OOK/ASK hardware.
- Local RF learning requires a supported RC-Switch decode; local arbitrary RAW learning is not offered.
- Imported RAW transmission cannot guarantee compatibility with every receiver or modulation.
- Static Dooya 40-bit import/transmission is supported; rolling-code systems are not.
- FSK and other radio frequencies are not supported.
- One-way RF/IR commands do not provide real device state. Home Assistant virtual entities show assumed state unless separate feedback exists.
- RF regulatory requirements differ by country. The operator is responsible for legal frequency, power, duty cycle, and device use.
- The web interface uses HTTP, not HTTPS. Keep it on a trusted network.
Troubleshooting
The web page is incomplete or the device stops responding
- Confirm a stable power supply and strong Wi-Fi signal.
- Keep 2.4 GHz AP channels fixed and consistent when using ESP-NOW across several APs.
- Use the pinned ESPHome version and run the full validation before flashing.
- Read network logs with
scripts/10_logs.sh. - Temporarily reduce BLE load by ensuring Home Assistant is connected and the proxy is not scanning unnecessarily.
RF learning times out
- Hold the original button long enough to deliver at least three identical decoded frames.
- Move the remote closer, but avoid touching the AR01V3 antenna area.
- Confirm that logs show a stable RC-Switch protocol and code.
- If the remote is Dooya, rolling code, FSK, or an unsupported protocol, use a supported static import or another gateway designed for that modulation.
A learned RF code is received correctly but the appliance does not react
- Test repeat count 5 first; some receivers ignore a single frame.
- Verify protocol, inversion, bit count, TE, and guard. Protocol 6 is not equivalent to transmitting the same bits with generic protocol 1.
- Compare with a known-working imported file. Reception proves the receiver can decode the remote; it does not prove a differently generated transmit waveform is compatible.
Imported IR is slow or unreliable
- Prefer parsed NEC or NECext when the original protocol matches it.
- Keep RAW captures to one clean command and use the correct carrier and duty cycle.
- Avoid excessive repeats and unnecessary gaps.
- Position the AR01V3 IR emitters with a clear line of sight to the appliance.
Home Assistant action search is empty
- Confirm the ESPHome integration is connected and the receiver runs version
1.2.4. - Reload the ESPHome integration or restart Home Assistant after a firmware upgrade that adds actions.
- For stored signals, search for Button: Press and select a
Send IR Slot NorSend RF Slot Nentity. Do not search for the preview sensor. - Direct actions begin with
esphome.<node_name>_transmit_....
Updating the local web assets during development
esphome/ar01v3_web_v3.js is embedded directly by ESPHome through js_include.
No separate generator is required after changing it.
Edit esphome/components/flipper_importer/flipper_page.html, then regenerate the compressed header:
python3 scripts/generate_flipper_page.py
Edit esphome/components/nightmatiq_mesh/nightmatiq_page.html, then regenerate its compressed header:
python3 scripts/generate_nightmatiq_page.py
Run scripts/00_self_test.sh afterward. Do not edit generated headers by hand.
Related project
The same Steinel NightmatIQ Plus functionality is also available in the dedicated Steinel NightmatIQ Plus Gateway for ESP32-C3. Choose that project for a small standalone ESP32-C3 installation without the AR01V3 RF/IR and ESP-RC01 features; choose this repository when NightmatIQ should be an optional integration in a multifunction AR01V3 gateway.
Credits, license, and support
- Author: Bartosz Supcziński, bartek@env.pl.
- ESPHome project identifier retained for upgrade compatibility:
envpl.ar01v3_esp_rc01_gateway. - Project-specific code: GNU GPL version 3 only; see LICENSE.
- Third-party provenance: THIRD_PARTY_NOTICES.md.
- Security reports: SECURITY.md.
- Contribution rules: CONTRIBUTING.md.
Parts of the hardware configuration and storage component originate from Athom’s public ESPHome configuration repository. Athom retains all rights to its original work. Project-specific additions are provided under GPL-3.0-only; the detailed attribution and licensing status of upstream material are recorded separately in THIRD_PARTY_NOTICES.md.
This is an independent community project and is not an official Athom, ESPHome, Home Assistant, or Flipper Devices product.